
How to Generate MIDI for a Complete Track — Chords, Bass and Pads, Section by Section
Eight good bars, looped for an hour. Here's how to get chords, bass and pads for every section of the track into your DAW — not just the loop.
It's late, and you've got eight good bars. A pad, a bass note under it, maybe a chord change that made you sit up. You've been looping them for an hour.
You know what the track should become — an intro that breathes, a section where the low end arrives, a breakdown, a peak, a way out. You can hear the shape. What you don't have is the next hundred and forty bars of harmony to fill it. So you duplicate the loop, drag it along the timeline, and tell yourself you'll "vary it later".
That's not a sound-design problem, and it isn't a talent problem. It's a whole-track problem: the loop is written, the song isn't, and writing chords, bass and pads section by section across seven minutes is slow, fiddly work that kills the idea before you get there.
This post shows how to get the MIDI for a complete track — every section, every chord, a bass line and two pad layers — into your DAW in a few minutes, using one worked example all the way through.
Why one good loop rarely becomes a finished track
1. A loop has no sections
Eight bars repeated is a mood, not a structure. A finished track needs contrast between sections — a verse that settles, a chorus that lifts, a breakdown that suspends, an outro that resolves. In harmonic terms, each of those wants a different progression. Copying one loop across the timeline gives you the same four chords for seven minutes, and no amount of filter automation hides it.
2. Harmony, bass, and pads are three jobs, not one
Once you do write a progression for each section, you still have to voice the chords, write a bass line that follows the roots, and build a softer layer that moves underneath. Three passes, per section, all in the same key. That's the part that eats the evening.
3. Lengths are guesswork
How long is a psybient intro? How many bars before the first peak? When you arrange by feel, sections end up 12 or 20 bars long, phrases don't line up with the drums, and the track either ends at three minutes or drags past ten. Phrase lengths in multiples of 8 and 16 are what make a DJ-friendly, mix-friendly track, and they're easy to lose sight of mid-session.
4. The chords vanish once they're MIDI
Even when the harmony is right, it disappears into the piano roll. Three weeks later you open the project and have to work out from the notes whether that was Dm9 or Fmaj7. Writing a lead or a vocal over it means reverse-engineering your own song.
What a "complete track" of MIDI actually means
Before any tool, it helps to be specific about the target. For a track you can produce on top of, you want:
- An arrangement — named sections with realistic bar counts, in order, adding up to a sensible length for the genre.
- A progression per section, in one key and scale, with a chord-change rate that keeps long sections moving.
- A pad or chord part — every chord held for its full length.
- A bass line that follows the chord roots at a density that suits the style.
- A second, looser pad layer for movement and atmosphere.
- The chord names travel with the MIDI, so you can still read the harmony in the DAW.
That's the skeleton. Drums, leads, vocals, sound design and mixing are still yours — and they go much faster when the skeleton already exists.
The tool: Track Builder
Track Builder is a browser-based MIDI generator for exactly this skeleton. You describe the shape of the track — genre, key, scale, sections and lengths — and it writes an in-key chord progression for every section, a matching bass line and an atmospheric pad layer, then exports them as standard MIDI files for any DAW, or as a single DAWproject file with everything already placed on the timeline.
It's one HTML file. No installer, no account, no subscription, and it never touches the network — double-click it and it opens in your browser, offline. It has 35 genre presets across electronic, ambient/chill, hip hop, rock, jazz, cinematic and world styles, 20 scales and modes, and nine chord types.
The current version (1.2) is the one this post uses. Its big changes are all about the whole track: realistic section lengths for every genre, chord names written into every exported file, a choice of MIDI layouts, and a new DAWproject export that lands Pad, Bass and Atmos tracks with one clip per section already in place.
Worked example: a seven-minute psybient track in A minor
Everything below uses one project, so you can follow it step by step:
| Setting | Value |
|---|---|
| Genre | Psybient / Psychill |
| Key and scale | A, Natural Minor |
| Tempo and time signature | 88 BPM, 4/4 |
| Chord type | 9ths |
| Chord change | Every 4 bars |
| Bass density | Simple (root and 5th) |
If you've read the Driftline post, this is the same key, tempo and chord family — on purpose. By the end, this track will be ready to take a melody from there.
Step 1 — Pick the genre, then set the key
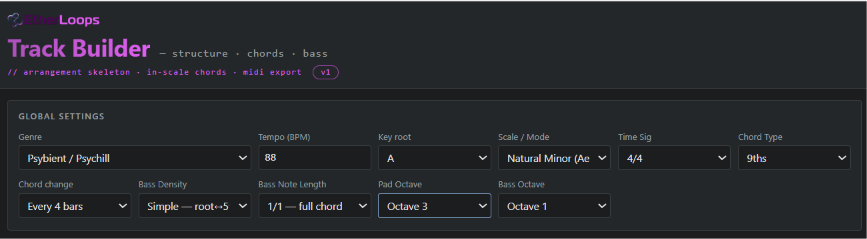
Choose Psybient / Psychill from the genre menu. That one choice sets a tempo from the genre's range (72–92 BPM), a scale from its pool, a time signature, a chord style and an arrangement template. Then set the key root to A, the scale to Natural Minor, the tempo to 88, the chord type to 9ths and chord change to Every 4 bars.
If you'd rather explore first, press ⚡ Generate all a few times. It re-rolls tempo, key, scale, chord style, bass density and arrangement — but inside the genre's style, so you never get a 170 BPM power-chord psybient track. Stop when something catches you, then fine-tune.
Step 2 — Check the arrangement
The psybient template lays out seven sections. Every one of them is a real phrase length — 8, 16 or 32 bars — and the total lands where a psybient track should:
| Section | Starts at bar | Bars | Progression |
|---|---|---|---|
| Intro | 1 | 16 | Am9 – Dm9 – Em9 – Am9 |
| Verse | 17 | 32 | Am9 – Fmaj9 – Dm9 – Em9 (twice) |
| Chorus 1 | 49 | 32 | Am9 – Em9 – Fmaj9 – Dm9 (twice) |
| Breakdown | 81 | 16 | Fmaj9 – Dm9 – Am9 – Em9 |
| Buildup | 97 | 8 | Am9 – Dm9 |
| Chorus 2 | 105 | 32 | Am9 – Em9 – Fmaj9 – Dm9 (twice) |
| Outro | 137 | 16 | Am9 – Dm9 – Fmaj9 – Am9 |
That's 152 bars — just under seven minutes at 88 BPM. Each section type has its own progression: the intro and outro settle on the tonic, the chorus uses the "lift" cadence, the breakdown starts away from home on Fmaj9, and the buildup leans on the dominant. The Buildup is the one section shorter than the progression: at a chord every 4 bars, its 8 bars hold only the first two chords.
Every row is editable. Change a length in the Bars column, drag rows to reorder, add a Bridge, delete the second chorus. You can also override chord type, chord-change rate and bass note length per section — keep the verse on 9ths and switch the breakdown to Sus2, for instance, and the breakdown immediately opens up.
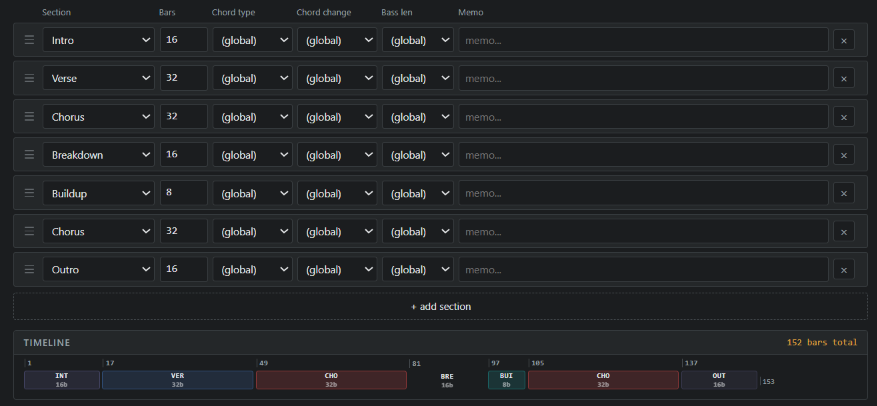
If the full-length version is more than you need, press ↺ Sections. About one time in three it gives you a short edit of the template, with every section of 16 bars or more halved — handy for a radio edit or a quick sketch.
Step 3 — Read the harmony before you export
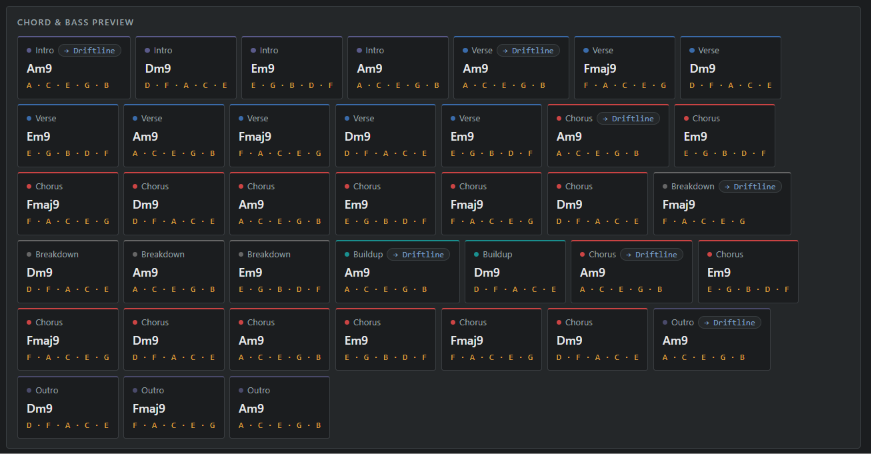
Below the timeline, the chord and bass preview lists every chord in every section with the notes it contains. The names are read off the notes each chord actually holds and spelled for the key, so A minor's sixth degree shows as Fmaj9, with its notes F – A – C – E – G.
Every note comes from the scale you chose. Chords are built by stacking scale steps rather than fixed intervals, and every bass note is forced onto a scale degree, so there's no out-of-key note to catch here. What you're checking is taste: does the chorus lift enough, is a chord every 4 bars too busy for the intro?
Step 4 — Choose how the MIDI should land
This is where version 1.2 changes the workflow most. There are three MIDI exports — Pad, Bass and Atmos — and a MIDI layout menu that decides how they arrive:
- Separate track per section — every section is its own MIDI track, so it imports as its own clip, sized to the section. The clip name tells you where it goes and what it holds:
Pad - Verse [bar 17] Am9 Fmaj9 Dm9 Em9 (x2). Every clip starts at bar 1 on import, so you drag each one to the bar in its name. Best when you want to rearrange or swap sections. - One track — sequenced on the timeline — one track per instrument, every section already at its bar. Drop it in and the whole song plays top to bottom. The track name carries the full chord map.
Either way, the chord names travel with the MIDI: in the clip or track name (every DAW shows that), as a marker at every chord change (Reaper, Cubase, Logic, Studio One and FL Studio read those, depending on import settings), and as text events for MIDI editors. The first chord of each section is labelled with the section, so the marker lane reads Verse: Am9, Fmaj9, Dm9, Em9… Flats and sharps are written as b and # inside the file, so names display cleanly everywhere.
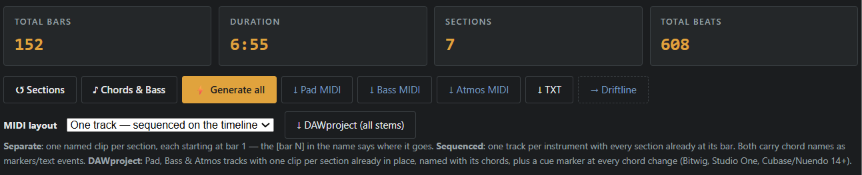
Step 5 — Or export the whole track as one project
If you work in Bitwig Studio, Studio One 6.5+ or Cubase / Nuendo 14+, skip the separate files and press ↓ DAWproject (all stems). You get one .dawproject file that opens with File → Open and contains:
- Pad, Bass and Atmos tracks, each with one clip per section already placed at its bar, named with the section and its chords, and coloured by section type.
- A Chords guide track — one clip per chord, named after it, sitting exactly under where that chord plays. It's a chord ruler for the whole song. It arrives muted; load an instrument and unmute it if you want to hear it.
- A cue marker at every chord change, with the section name on the first chord of each section.
- Tempo and time signature.
For the example track, that's seven clips per instrument across 152 bars, and the Chords track spells out the entire harmony under the arrangement. Load a pad, a bass and something grainy for the Atmos track, press play, and the song plays start to finish.

Step 6 — Give the Atmos layer some space
The Atmos export uses the same chord notes as the pad, but each note enters at a random offset inside its chord and holds for a random length. Some become long drones, others short fragments, so the layer drifts rather than blocks. Every click of ↓ Atmos MIDI re-rolls the timing — export three or four takes and keep the one that sits best.
In 1.2, when a short fragment starts while a long drone of the same note is still sounding, the drone stops there and the fragment carries the note to the drone's original end. The practical result: every Atmos clip ends exactly at its section end, in every DAW, instead of being cut short on import.
Atmos isn't a replacement for the pad — layer them. Keep the Pad clean and upfront, send Atmos through a long reverb or shimmer and tuck it underneath.
Step 7 — Build the rest on top
From here, it's normal production: drums, percussion, FX, a lead. Because the chords are named in the clips and on the ruler, writing a melody over the verse means reading "Am9 – Fmaj9 – Dm9 – Em9" off the screen rather than decoding the piano roll.
If you also use Driftline, the EtherLoops melody maker, you don't even need to read it. The → Driftline button on any section's first chord — or in the export row for the whole track — hands the progression over with key, scale, tempo and chord lengths, and Driftline writes a melody over it straight away. Driftline can also read the chords out of an exported Pad or Atmos file, as long as you keep Track Builder's filename (track-pad-A-minor.mid), because that's where the key and scale come from.
For the arrangement side in Bitwig — which tracks play where, with production notes on every track — see the Trellis post. The three tools split the job cleanly: Track Builder for harmony across the song, Driftline for the melody, Trellis for the arrangement map.
Which export fits your DAW
| DAW | Best export | Where the chord names show |
|---|---|---|
| Bitwig Studio | DAWproject | Clip names, Chords track, cue markers |
| Studio One 6.5+, Cubase / Nuendo 14+ | DAWproject, or MIDI | Clip names, markers |
| Ableton Live | MIDI, either layout | Clip names |
| Logic Pro, Reaper | MIDI, either layout | Clip names, markers, text events |
| FL Studio | MIDI, either layout | Clip names, time markers |
| GarageBand, Pro Tools, others | MIDI | Clip names |
Some DAWs ignore the tempo embedded in a MIDI file, so set the project to the same BPM before importing — 88 for the example.
What Track Builder doesn't do
Worth knowing before you buy:
- No melody and no drums. It writes chords, bass and pads — the harmonic skeleton. Melodies are Driftline's job; drums are yours.
- It doesn't read MIDI. Track Builder is generative, not analytical. You can't import an existing progression and have it continue it.
- No instruments or sounds. The exports are notes. The DAWproject brings tracks, clips, markers and tempo, but you load your own instruments.
- DAWproject isn't universal. Ableton Live, Logic Pro and FL Studio can't open it; use the sequenced MIDI layout there.
- A standard MIDI file has no clips. The sequenced layout arrives as one long clip per instrument. If you want one track per instrument and separate section clips, that's what DAWproject is for.
- Presets live in your browser. They survive reloads but don't sync between browsers or computers.
FAQ
Do I need an internet connection? No. Track Builder uses your system fonts and never touches the network. It works fully offline from the first open.
Which DAWs does it work with? Any DAW that imports MIDI — Bitwig Studio, Ableton Live, FL Studio, Logic Pro, Cubase, Reaper, Studio One, Pro Tools, GarageBand. The DAWproject export additionally opens in Bitwig, Studio One 6.5+ and Cubase / Nuendo 14+.
Is it only for ambient music? No. There are 35 genre presets — Techno, House, Trance, Drum & Bass, Lo-Fi Hip Hop, R&B, Rock, Jazz, Blues, Cinematic, Latin, Flamenco, Middle Eastern and more — each with its own tempo range, scales, chord styles and arrangement templates.
How long are the tracks it generates? Genre templates use real phrase lengths — 4, 8, 16 or 32 bars, 12-bar sections for Blues — so tracks come out at a typical length for the style: roughly 3–5 minutes for pop and club genres, 5–12 minutes for ambient styles. Every section length stays editable.
Why does a chord sometimes sound tense on exotic scales? Every note is forced to a scale degree, so it can't be out of key. Tension on Phrygian Dominant, Locrian or Super Locrian is a property of the scale — that's what they're for.
I already own an earlier version. Do I pay again? No — updates are free for existing customers. Replace your old track-builder.html with the new file; your saved presets carry over.
Can I use the MIDI in commercial releases? Yes. The MIDI you export is yours — no royalties, no attribution.
Get the skeleton, then make the track
The loop was never the hard part. The hard part is the other 140 bars — the progressions, the bass under them, the layers that move — written section by section in the same key, at lengths that make sense. Track Builder does that in the time it takes to pick a genre, and hands it to your DAW with the chord names still attached.
New to Track Builder? The original Track Builder post is still up if you want the story of the first version.
→ Get Track Builder at shop.etherloops.com
EtherLoops builds production tools for ambient, chill, and atmospheric music makers. Browse more at etherloops.com.